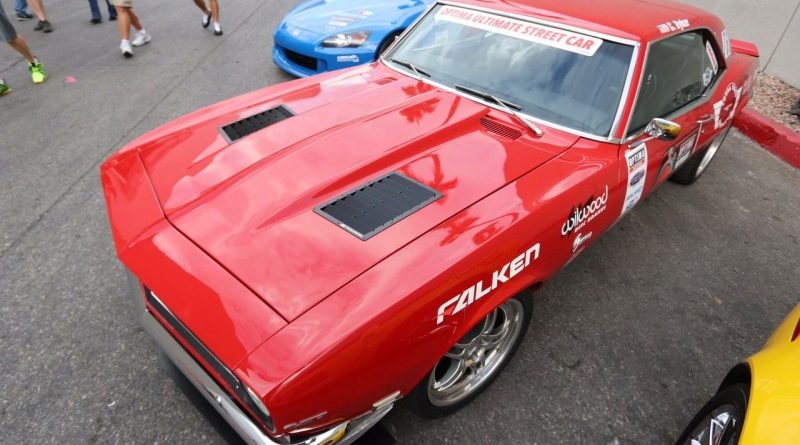
Trackspec Motorsports Hood Louvers Install – 1967-1969 Camaro
I’ve had my eye on Trackspec Motorsports hood louvers (aka vents) for a while now. They caught my attention when I noticed them popping up on various cars that get tracked in SoCal a few years ago. The design was both aesthetically and functionally superior to a lot of the add on vents I had seen. However, at the time I first became aware of them they didn’t yet offer a model specific to the first generation Camaro. While Trackspec Motorsports offers various universal designs I patiently waited for them to release their 1967-1969 Camaro specific louvers.
I was lucky enough to get my hands on one of the first production sets* of Tracksport hood louvers for firstgen Camaros a few months back and install them on my 1968 Camaro. What follows is the install process and product review of these vents.
What comes with the Trackspec Camaro Hood Louvers
- Two satin black hood louvers
- Two paperboard templates
- A mix of short and long rivets (choice of silver or black)
The Install
Step 1: Locating the hood louvers
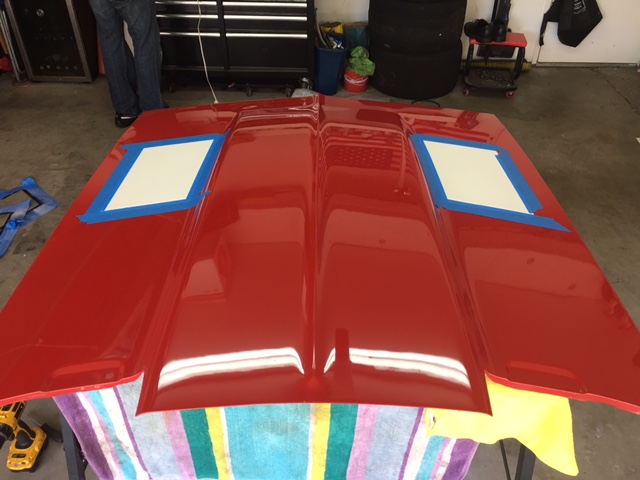 The firs step is figuring out where you want to place the hood louvers. The supplied templates are the same outer diameter as the vent and has “cut line” cutouts where you need to cut the hood. I decided on hood vent placement based on three variables.
- I wanted the hood louvers placed towards the center of the hood enough to avoid cutting the strength rib running down the sides of the hood.
- Placing the louvers closer to the front of the hood but behind the radiator fan shroud opening and
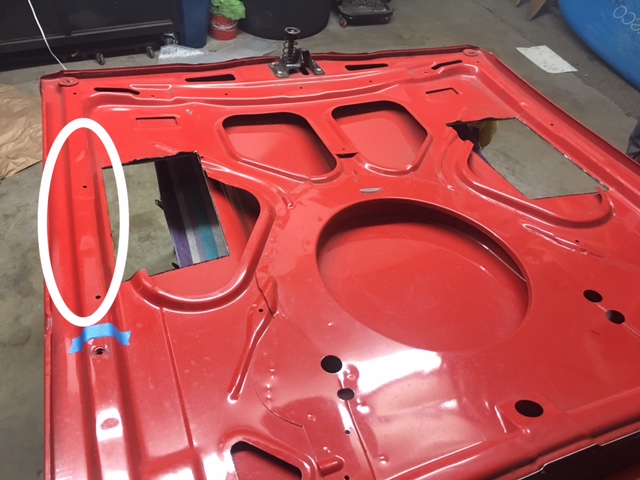
- far enough forward so that the inside front rivet would not have to pass through the small bump in the below circled area and instead be flat.
I installed my Trackspec louvers 3.5″ from the edge of the hood and 13.25″ from the front of the hood to the outside corner (top left or top right in above picture).
Step 2: Cutting the hood
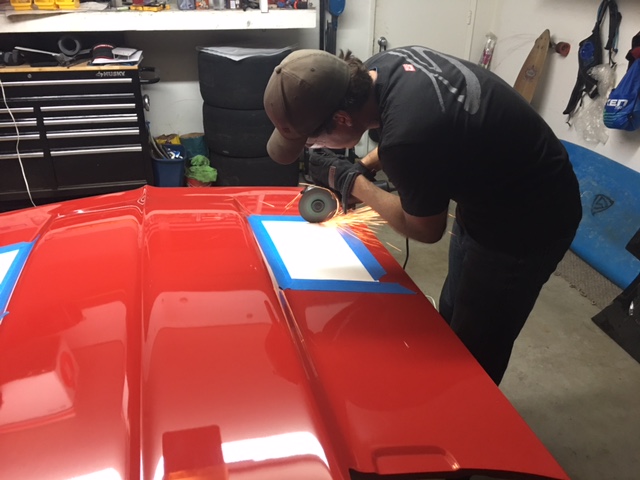 Trackspec recommended using a grinder with a “thin cut” cutoff wheel rather than a reciprocating saw or other cutting methods. Given that my hood was already painted I wanted to ensure that any paint damage caused by the cuts would be covered by the hood louver.
The angle grinder worked well. The paint about 1/8″ from the cut line was burned in spots but is easily covered by the hood vent. I did some basic edge prep and taped off the cut openings about 1/8″ back on top and bottom and hit it with color matched touch up spray paint to keep it from rusting. Also, because my hood understructure was body color this helped paint some of the now exposed understrcuture so it would be the right color when looking though the vent from the top of the hood. While there was no damage to my paint, I would advise others to cover all painted surfaces during the cutting operation to avoid spark damage.


Step 3: Riveting the hood louvers in place
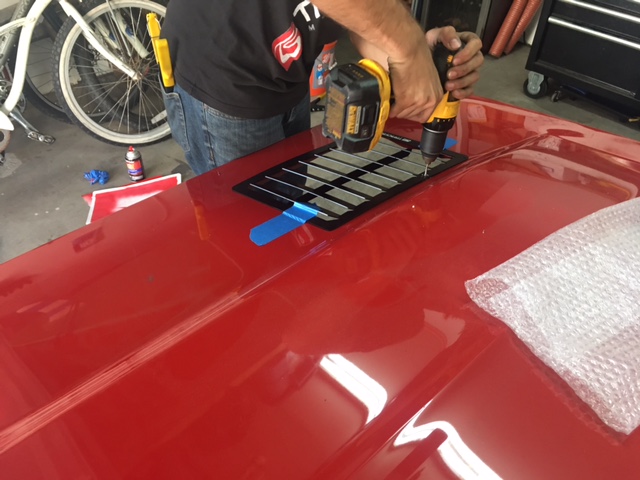
Following the template means you have about a 1/4″ larger hole than the louver part of the vent. This gives you a bit of flexibility in positioning and means your cut doesn’t have to be 100% perfect. Next, we then taped the louver down and proceeded to drill and rivet each hole one at a time. My louvers matched the slope of the hood perfectly side to side. However, front to back the vent was slightly bowed more than my hood. Therefore, when drilling and riveting I started at one end and installed one at a time so that as the vent laid down and conformed to the hood. This way I didn’t have to worry about the last set of holes getting out of alignment which might have happened if you drilled all the holes and then installed the rivets. Drill slow and apply light pressure! This will help minimize any jagged metal on the hole exit or pinching shavings between the louver and hood.
The finished product
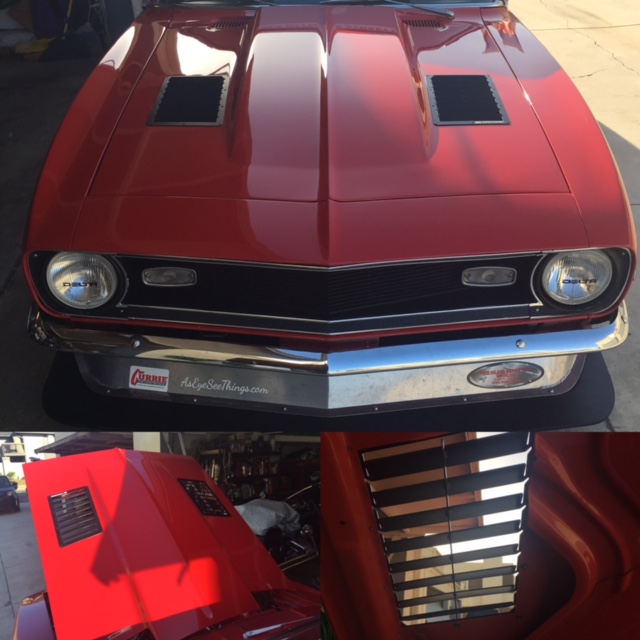
Thoughts on the Trackspec Motorsports Hood Louvers
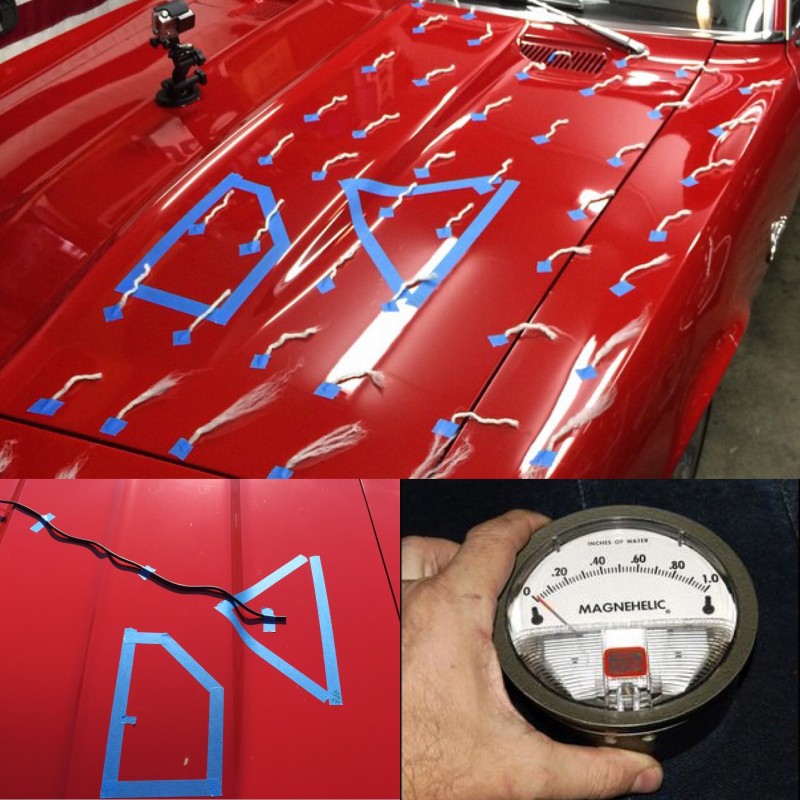
They work! I had two goals with this install. First, to lower under hood temps during autocross, especially while in the hot pits. Second, to improve the aerodynamic efficiency of the car at high speed. Surprisingly it was autocross and especially the hot pits that cause large under hood temperature spikes more than road course driving. Twice at all day autocross events I’ve had alternator failures caused by heat. Since installing these vents I’ve seen a significant reduction in under hood temps after an autocross run. For my second objective, I haven’t done follow up testing with my magnehelic gauge. Subjectively there appears to be less lift on the hood but I will do more testing in a future post.
The quality of the Trackspec Motorsports Camaro hood louvers themselves are top notch and the install is surprisingly easy. Well, once you get over the fear of that first cut!
More before and after testing coming soon…
* Full disclosure: I did not pay retail for the Trackspec Motorsports Hood Louvers.
Thanks for the write-up Chad. I am getting the Tracspec Louvers as well, and was wondering how the install would go on a fiberglass hood. I’m hoping the bow you encountered in the louver won’t occur as I don’t have the luxury of a rigid steel hood.
Hi Michael. I installed these again in my very thing carbon fiber hood. It wouldn’t have any more strength than your fiberglass hood. I took some extra time to bend the louvers by hand so that the arc matched the hood. First time I installed them I didn’t spend much time on this and one of them caused a noticeable wave in the reflection of the hood. So I drilled out the rivets and bent it until it laid flat on the hood. The bending part is only an extra 20 minutes worth of work.
Great write up, thank you Chad. I also read your posts on pro-touring.com, and you had a lot of great info there. From your forum posts after testing did you feel there was more pressure right under the center start of the cowl bump as opposed to on the sides of the cowl where you have them placed? It seems that most people are placing them where you did (due to understructure of the hood) but if I understood your testing right they would work slightly better being placed on the front portion of the cowl scoop just rear of the fan shroud? With my setup it is possible for me to place the vents anywhere… what would be your recomendation?
I have a 67 camaro with harwood 2″ Cowl fiberglass hood with no understructure at all. I also purchased a cowl air pan to properly seal my air filter off to the cowl. I am working on a rad core support block off plate, and lower block off plate from spoiler to oil pan similar to yours. Currently it is all open with an SBC engine, and I can tell there is a ton of pressure under the hood. It loosened and released the hood latch on the track last weekend. Thank you for any advice.
Hi Brian, thanks for the comment. Regarding placement, yes I found the center of the hood on the raised cowl area to be best. There is good pressure differential on the sides but much more on the center. If I didn’t have any under structure to worry about I would’ve probably done the vents there. All your other mods sound like excellent additions that should help with aerodynamics and cooling.
Hey Chad… Great writeup on the louvers. I was wondering if you did any testing that showed better cooling temps at highway speeds? I have a ’69 BBC with Vintage Air, and it seems to run hotter with the addition of the VA’s condenser blocking the radiator core. The cars been off the road this past winter, waiting on a new interior, but I built a lower closeout panel and combined with the upper closeout panel I’m hoping the air pressure will increase and cause more airflow to go through the condenser and radiator core. I’m also thinking ahead and considering adding louvers similar to yours if road temps stay too high to switch my eFans off. I use a PWM to control the two 12″ Ford/Bosch fans, and they are set to come on at 195°. Last summer on a 85-90 degree day I couldn’t get the car below 200° once it was warmed up and traveling at 40-55 mph. I know there’s a lot of heat under the hood, and generally was wondering if your car ran any cooler with the louvers installed. I understand that with a thermostat cars will all generally run at the prescribed temps, but I was thinking about when and how often your fans are coming on if you have eFans? Was also wondering whether the aluminum material is flimsy and easy to bend or distort the louvers? Thanks for the story and pictures.
Hi Mike,
I did not see a difference in highway temps as even on 100* plus days and running the A/C the water temps stayed at 195 before and after the vents. For me the biggest difference in temps was in autocross competition where the average speed is lower but you are still working the engine hard.
In my car above 45 mph the electric fan never kicks on even with the A/C on.